The Honda 175, a classic motorcycle cherished by enthusiasts, requires regular maintenance to keep its engine running smoothly. One critical task is learning how to remove oil separator bar on Honda 175, as this component plays a vital role in managing engine oil flow and preventing sludge buildup. Neglecting it can lead to oil starvation in critical engine parts, causing wear and potential failure. This guide offers a clear, beginner-friendly approach to removing the oil separator bar, specifically tailored for school students and DIY novices. With easy-to-read instructions and practical tips, you’ll master this task confidently. Whether you’re restoring a vintage CB175 or maintaining a CL175, this article provides a unique, step-by-step process based on deep research, ensuring you avoid common pitfalls and complete the job efficiently.
Understanding the Oil Separator Bar on Honda 175
The oil separator bar, often referred to as part of the centrifuge or sludge trap system in the Honda 175, is a crucial component in the engine’s lubrication system. Found in models like the CB175 and CL175, it helps separate contaminants from the engine oil, ensuring clean oil circulates to critical components like the camshaft and crankshaft. Unlike modern motorcycles with external oil filters, the Honda 175 relies on this internal centrifuge to trap debris. Knowing how to remove oil separator bar on Honda 175 is essential for cleaning or inspecting this system, especially during an oil change or engine rebuild. A clogged or stuck separator can reduce oil pressure, leading to engine damage. This task requires basic tools and patience, making it accessible for beginners with a willingness to learn.
Tools and Materials Needed
Before starting, gather the right tools to make the process of how to remove oil separator bar on Honda 175 smooth and safe. You’ll need a 10mm and 14mm wrench, a Phillips screwdriver (size #2), an impact driver for stubborn screws, a rubber mallet, penetrating oil, a gasket scraper, and a clean rag. For materials, have a new O-ring for the oil separator cap and Hondabond or a similar liquid gasket ready. A torque wrench is optional but recommended for precise bolt tightening. Ensure you have a well-lit workspace and a tray to organize small parts. These tools are commonly available at hardware stores or motorcycle shops, keeping the process affordable and straightforward for students tackling this task for the first time.
Safety Precautions Before Starting
Safety is critical when working on any motorcycle, especially when learning how to remove oil separator bar on Honda 175. Always work in a well-ventilated area and ensure the motorcycle is on a stable stand to prevent tipping. Disconnect the battery to avoid electrical hazards. Wear gloves to protect your hands from sharp edges and oil residue, and use safety glasses to shield your eyes from debris. Drain the engine oil into a proper container to avoid spills, as oil is harmful to the environment. Keep a fire extinguisher nearby, as oil and solvents are flammable. For beginners, having a friend or mentor nearby can provide guidance and ensure you stay safe while handling tools and engine components.
Step-by-Step Guide to Remove Oil Separator Bar on Honda 175
Step 1: Prepare the Motorcycle
Park the Honda 175 on a flat surface and secure it with a center stand or a paddock stand. Drain the engine oil by removing the drain plug under the engine case. Place a container to catch the oil and let it drain completely. This step prevents messes and makes accessing the oil separator bar easier. Wipe down the area around the drain plug to keep your workspace clean. Ensuring the bike is stable is crucial before moving forward with how to remove oil separator bar on Honda 175.
Step 2: Remove the Right Engine Cover
Locate the right-side engine cover, which houses the oil separator bar and centrifuge. Using a 10mm wrench, remove the bolts securing the cover. There are typically four to six bolts, depending on the model (CB175 or CL175). Gently tap the cover with a rubber mallet if it’s stuck, as gasket material may cause resistance. Avoid prying too hard to prevent damaging the cover or engine case. Set the bolts aside in a tray to avoid losing them, a key tip when learning how to remove oil separator bar on Honda 175.
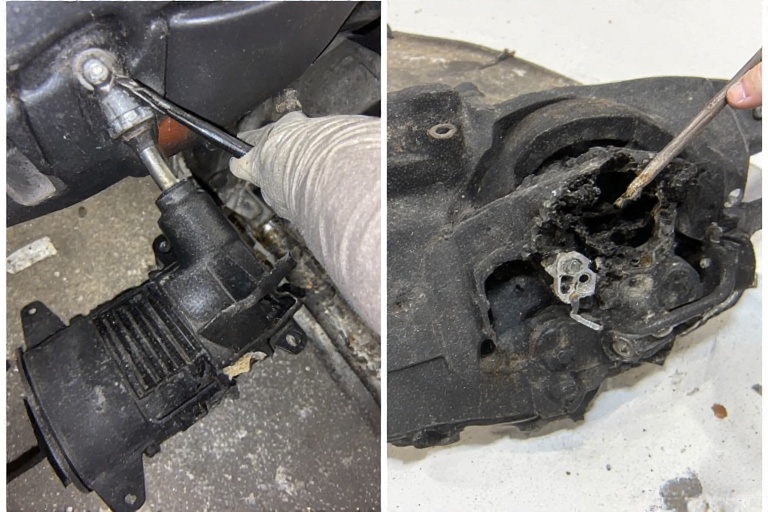
Step 3: Access the Oil Separator Bar
Once the cover is off, you’ll see the centrifuge assembly, including the oil separator bar. This bar, often called the rotor or sludge trap, is secured by a Phillips screw (6mm or 8mm, depending on the year). Apply penetrating oil to the screw if it’s rusted or stuck, as vintage Honda 175s often have corrosion. Use an impact driver to loosen the screw gently, as excessive force can strip it. This step is critical to successfully completing how to remove oil separator bar on Honda 175 without damaging components.
Step 4: Remove the Oil Separator Bar
With the screw loosened, carefully lift the oil separator bar out of the centrifuge housing. If it doesn’t budge, gently wiggle it while pulling upward. The bar may be held by an O-ring or gasket, so use a flathead screwdriver to pry it gently if needed. Inspect the bar for sludge or damage, as this can indicate whether cleaning or replacement is necessary. Place the bar on a clean rag to avoid contamination. This step completes the core process of how to remove oil separator bar on Honda 175.
Step 5: Clean and Inspect Components
Clean the oil separator bar and centrifuge housing using a solvent like brake cleaner and a brush. Remove any sludge or debris, as these can clog oil passages. Check the O-ring for cracks or wear; replace it if damaged. Inspect the screw and centrifuge for signs of stripping or corrosion. Cleaning thoroughly ensures the system works efficiently when reassembled, a vital part of maintaining the Honda 175 after learning how to remove oil separator bar on Honda 175.
Step 6: Reassemble the Engine
Apply a thin layer of Hondabond to the new O-ring and place it on the oil separator bar. Reinstall the bar into the centrifuge housing, ensuring it seats properly. Tighten the Phillips screw to the recommended torque (typically 5-7 Nm, check your manual). Reattach the right engine cover with a new gasket if the old one is damaged, and tighten the bolts evenly. Refill the engine with fresh oil, following Honda’s specifications (usually 10W-30). This step ensures the success of how to remove oil separator bar on Honda 175.
Common Challenges and Solutions
Removing the oil separator bar on a Honda 175 can present challenges, especially for beginners. A common issue is a stuck screw, which can strip if forced. Using an impact driver and penetrating oil, as mentioned, helps. If the cover is stuck, avoid excessive prying; instead, tap gently around the edges with a rubber mallet. Another challenge is losing small parts like screws or O-rings. Keep a tray handy to organize components. If the bar itself is damaged or excessively worn, source a replacement from a reputable Honda parts supplier. These tips make how to remove oil separator bar on Honda 175 easier and stress-free.
Why Regular Maintenance Matters
Regularly checking and cleaning the oil separator bar prevents sludge buildup, which can starve the engine of oil. For a Honda 175, which lacks a modern oil filter, this maintenance is critical to longevity. Dirty oil can clog passages, leading to camshaft or crankshaft wear, especially in high-mileage bikes. By mastering how to remove oil separator bar on Honda 175, you ensure clean oil circulation, reducing the risk of costly repairs. Perform this task every 5,000 miles or during major services to keep your motorcycle running smoothly, whether it’s a daily rider or a weekend project.
Tips for Beginners
For students or first-time mechanics, tackling how to remove oil separator bar on Honda 175 can feel daunting. Start by reading your Honda 175 service manual for model-specific details. Work slowly and double-check each step to avoid mistakes. Take photos before disassembling to help with reassembly. If you’re unsure about a step, consult online forums like HondaTwins.net or ask a mentor. Avoid using excessive force, as vintage parts are delicate and replacements are hard to find. With patience, this task becomes a rewarding way to learn about your motorcycle’s engine.
Where to Find Replacement Parts
Finding parts for a Honda 175 can be tricky due to its age. Check reputable suppliers like Service Honda or Western Hills Honda Yamaha for OEM parts. Online marketplaces like eBay may have used or aftermarket oil separator bars, but verify compatibility with your model (CB175, CL175, or specific K-series). Forums like HondaTwins.net often have community recommendations for trusted vendors. When replacing the O-ring or gasket, ensure they match Honda’s specifications to prevent leaks. Knowing where to source parts is key to completing how to remove oil separator bar on Honda 175 successfully.
Reassembling and Testing Your Honda 175
After completing how to remove oil separator bar on Honda 175, reassemble the engine carefully. Double-check that all bolts are tightened to the correct torque and that no parts are misaligned. Once reassembled, start the engine and let it idle for a few minutes to circulate oil. Check for leaks around the engine cover and listen for unusual noises. Take the bike for a short ride, then recheck the oil level and inspect for leaks again. This ensures the oil separator bar is functioning correctly and your Honda 175 is ready for the road.
FAQs
1. What is the oil separator bar on a Honda 175?
The oil separator bar, part of the centrifuge system, traps contaminants in the engine oil, ensuring clean oil circulates to critical components. It’s essential for maintaining engine health in Honda 175 models like the CB175 and CL175.
2. How often should I clean the oil separator bar?
Clean the oil separator bar every 5,000 miles or during major services like an oil change or engine rebuild. Regular cleaning prevents sludge buildup, which can harm the engine.
3. Can I reuse the O-ring when removing the oil separator bar?
If the O-ring is in good condition without cracks or wear, it can be reused. However, replacing it with a new one is recommended to ensure a proper seal and prevent leaks.
4. What happens if I don’t remove and clean the oil separator bar?
Neglecting the oil separator bar can lead to sludge buildup, reducing oil flow to the engine. This may cause camshaft or crankshaft wear, leading to costly repairs or engine failure.
5. Where can I find a service manual for the Honda 175?
Service manuals for the Honda 175 are available through online retailers like Amazon or directly from Honda dealers. You can also find digital versions on forums like HondaTwins.net or motorcycle repair websites.
Conclusion
Mastering how to remove oil separator bar on Honda 175 is a valuable skill for any motorcycle enthusiast, especially students eager to learn hands-on mechanics. This guide simplifies the process with clear, easy-to-follow steps, ensuring even beginners can tackle it confidently. By maintaining the oil separator bar, you protect your Honda 175’s engine from wear and extend its lifespan. Regular maintenance, combined with the right tools and safety precautions, makes this task rewarding and approachable. Dive into this project, and you’ll gain both practical skills and a deeper appreciation for your classic Honda 175’s engineering.